Monday, December 22, 2014

Assignment: Analyzing Motion Pictures


Analyzing Motion Pictures


O B S E RV E
 identify and note details.
Sample Questions:
Describe what you see and hear. · What do you notice first? · Do you only see live action, or are there any special effects or animation? · Describe any words you see on the screen. · What do you
notice about the length of the motion picture? ·Does anything about it seem strange or unusual? ·
What other details do you notice?


R E F L E C T
Generate and test hypotheses about the source. What was the purpose of this motion picture? · Who do you think created it? · Who are the people who appear in it? · What tools and materials were used
to create it? · Do you think it was filmed on location, or was there a stage set? · Who do you think was the intended audience? · What feelings or ideas do
you think its creators wanted to communicate? · If someone created this motion picture rofessionally today, what
would be different?


Q U E S T I O N
Ask questions to lead to more observations and reflections.
What do you wonder about...
who? · what? · when? · where? · why? · how?


Speculate about the purpose of the motion picture and what its
creators expected it to accomplish. Do you think the motion picture
achieved their goals? Explain why you think so.

Monday, December 15, 2014

Stop Motion Film: Editing in Movie Maker


EDITING 


1. Use a program such as Movie Maker 

2. Connect the camera and download images 

3. Open new Project 

4. Click and Drag clips down to the storyboard 

5. Click onto the first frame; press the play button on the preview screen 

6. To insert Title Frame 

7. Tool in the menu Bar, choose add title and credits. Choose Title. Change the font and color by the corresponding 

icons. Make the title larger. You may also change the background color. 

8. Change the Title Animation 

9. To insert Credits Frame 

a. Tool in the menu Bar, choose add title and credits. Choose Credits. 

b. In the top rectangle: Type: Created By, Produced By, or something you come up with. 

c. The boxes on the left will be in Large Font and the boxes on the right will be a small font. This is where 

10. To edit clips: 

a. Select the Timeline view 

b. Preview Window: Press play and the desired spot to "cut" the clip press the pause button- you may 

c. Press the CUT button 

d. Press play to continue to the end of this section that is to be cut. 

e. Press pause to stop and press the CUT button again. 

f. On the timeline, click onto the "Cut" clip section to select it. Right click and select Cut from the menu. The 

g. Repeat until all the unwanted sections are cut out of the timeline. 

11. You may press play and watch the whole video throughout this process as many times as you want or need. 

you type Characters by: Joe P. (no last names) etc. 

rewind the clip to the perfect spot if you do not press pause fast enough. 

section is gone. 

FINAL PROCEDURES and PRESENTATION 

Save As Movie 

1. All short films should be submitted by instructor through Google classroom.

Tuesday, December 9, 2014

Monday, December 8, 2014

Stop Motion Film: ready to shoot?!

BACKGROUNDS
1. Choose one or more backgrounds that will be used throughout the entire story.
2. Create a background for the set using mat board and acrylic or tempera paint or find a location suitable for filming
 
 
PROPS
1. Collect and bring in props to be used on the set.
2. Make additional props to be used on the set.
Character Requirements for Claymation/Small Scale Figures:
 Fits the theme
 Characters are 3 to 4 inches tall or long
 Expressive facial features
 Character is easily movable
 Character stays together throughout the unit
 
 
SET CONSTRUCTION
1. Set up the background
2. Attach any movable part(s) to the background i.e., clouds, birds.
3. Arrange the props for filming
4. Place the characters in their beginning pose.


FILMING YOUR ANIMATION
1. Using a digital camera or smart phone, take a photo or 3 second shot of your characters in the beginning pose.
2. Slightly move the characters and possible the movable background parts.
3. Again take a photo or 3 seconds of digital video.
4. Continue this process to capture the story’s theme.
5. At least 50 photos should be shot.


Friday, December 5, 2014

False Advertising: Photo Walk

Please read this short article before we leave! 


Let's see if you can identify with false advertising today! 
 
Post a photo from today's walk, side by side with an advertisement from that business. Write briefly how advertisements are not always what they seem.

Wednesday, December 3, 2014

Stop Motion Film: Windows Movie Maker

 
1. Open WMM. Open the program called "Windows Movie Maker" that's in your start menu. If you don't already know this software, then you should read a little about How to use it.Go to run(win+R) and type 'moviemk' to run it.
 
2. Import the pictures. Import the series of pictures that you want to make into a stop motion film.
 
 
3. Arrange pictures. Arrange them how you think they should be in your movie. Since a stop motion film are a combination of many pictures, this step might take a while.


4. Add in and be creative! Add music or audio, title, subtitle and end text if you want to.


Watch it all at once if you prefer to learn this way....


Now, you try!

Tuesday, December 2, 2014

Stop Motion Film: Tips for Making


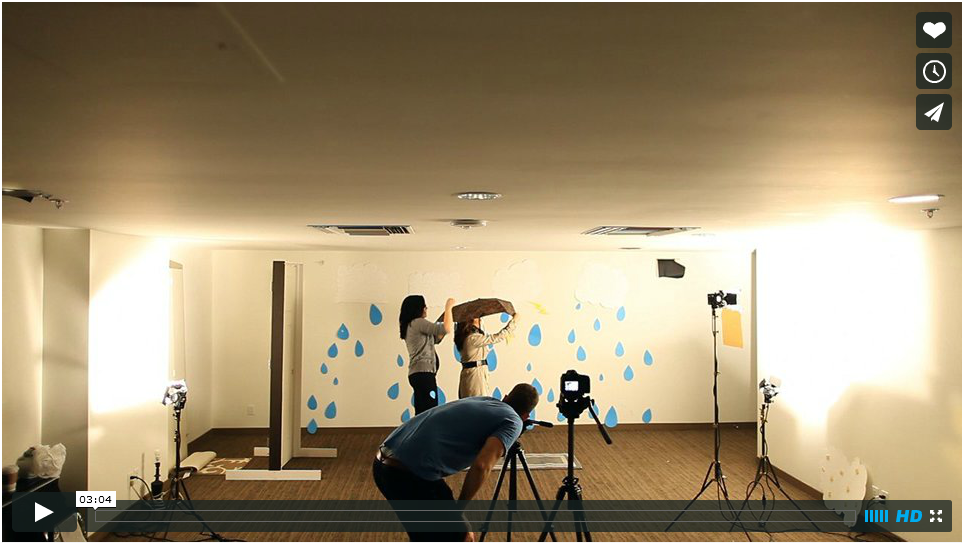
Creating a stopped motion piece is the perfect way to unite your inner photographer and videographer through a trendy and fun medium. Blending the creativity of photography with the motion of video, stopped motion brings hundreds and thousands of images together to tell a sequential story.
 
 CLICK HERE FOR BEHIND THE SCENES VIDEO
http://vimeo.com/67537975

Here are some tips for creating a stopped motion piece.

1. Brainstorm your visuals

Through stopped motion you have thousands of images to shoot, but you need to place the same kind of focus you had with one image, and apply it to many. It is probably helpful to discuss an “image” as a “scene”. So, in a movie, every element in a scene is important right? Each element helps to describe the story, thus making it stronger. Same principle is applied in the elements of a photo. Same principle is applied in stopped motion.
For these visuals, your story needs to be extremely strong. And by story, I mean, “series of images”. Just like in video you create a flow of progression from the “scenes” of your story, your “scenes” also must create a progression.

2. Create a storyboard for your stopped motion piece

If you go into stopped motion creation without planning and storyboarding, you will be sunk with a l.o.t. of time in post processing. In video, the medium is in clips. But in photo, the medium is in single images. Unless you have thought out what elements and scenes you want in your piece, you will have the unfortunate experience of sorting through thousands of individual photos to try and put the piece together. Take my advice. It is challenging enough to work with thousands of individual photo’s when you have your piece planned out. Without a plan, you will be left with trying to sort through what series of photo’s to move where, etc. etc. and it’s just incredibly complicated. So don’t do that. Story board.
I’m sure you’ve heard enough about storyboarding from the great “making of” specials on different movies, but practically, how do you dissect a story board?
  • Start with a script. You must k.n.o.w. what you want to communicate. Sometimes it’s easier to start this in writing. Write a story just like any other. Intro, which explains the characters and the core of the film. The development, in which more elements are introduced to further complicate or challenge what already existed. And then the conclusion and resolution of story and all it’s elements where your audience can take away the final message.
  • Mentally visualize your story. What visual elements create the intro, the development, and the conclusion? Will you need to alternate between wide angle and detail shots? Remember, the point of stopped motion is to literally CATCH MOTION. The series of HOW you catch that motion is what you need to visualize.

3. Shoot to NOT edit

The point of a stopped motion piece is not individual photos. The point is multiple image series capturing motion. You don’t have the time to edit each individual shot. You will be editing the series – culling and placing them into a timeline.This means that unless you “shoot to kill” you are going to be wasting a lot of time simply because you didn’t get it right the first time. Now, this is not to say that you don’t have the freedom to make artistic edits, but remember it is going to add more time. Using Imovie, Windows Movie Maker, or Final Cut Express will give you a variety of editing options for your disposal.


4. Add audio to give emotion and connect the story

Audio isn’t the main point of a stopped motion film, but it most certainly can strengthen the piece by magnanimous proportions. Sometimes the audio will simply be music. Sometimes it will be sounds. Sometimes it will be narration. Sometimes it will be all three. It truly just depends on the scope of the project. Sometimes it is easier to start with audio and add visuals, but it can be much simpler to plan audio when nearing the completion of visual assembling. Then I can determine how much audio to bring in and what the feel of it ought to be.

Stop Motion Film: The Details

INSTRUCTIONS FOR STOP-MOTION SHORT FILM:


STORY BOARD
1. Create a simple storyboard of eight to ten pictures that will be the main story of your film.
2. Keep the story board simple using stick "people". (use as many copies as necessary)
3. The storyboard should also have the parts of the background that will be in motion, i.e. clouds.
 
 
BACKGROUNDS
1. Choose one or more backgrounds that will be used throughout the entire story.
2. Create a background for the set using mat board and acrylic or tempera paint or find a location suitable for filming
 
 
PROPS
1. Collect and bring in props to be used on the set.
2. Make additional props to be used on the set.
Character Requirements for Claymation/Small Scale Figures:
 Fits the theme
 Characters are 3 to 4 inches tall or long
 Expressive facial features
 Character is easily movable
 Character stays together throughout the unit
 
 
SET CONSTRUCTION
1. Set up the background
2. Attach any movable part(s) to the background i.e., clouds, birds.
3. Arrange the props for filming
4. Place the characters in their beginning pose.


FILMING YOUR ANIMATION
1. Using a digital camera or smart phone, take a photo or 3 second shot of your characters in the beginning pose.
2. Slightly move the characters and possible the movable background parts.
3. Again take a photo or 3 seconds of digital video.
4. Continue this process to capture the story’s theme.
5. At least 50 photos should be shot.


Monday, December 1, 2014

Assignment: Stop Motion Film


Stop Motion Film Project!


You can create shorts such as a PSA, a documentary,
a quick skit, a historical re-enactment, a cooking show, a science
experiment gone wrong, an original drama, a recreation of the favorite book in 5 minutes, a music video, a how-to video, a talk-show,or just about anything that works under 5 minutes!


Film submissions are judged on their overall artistic and technical quality.
Films should be no longer than 5 minutes in length.
Groups of 2-3 students have worked well in the past.

Film Festival will be showcased at the end of May 2015
For Tips, Ideas, How-to’s, Submission Requirements, and to Submit your Video
Join Google Classroom, Class code:
lw0ahlh


Tuesday, November 25, 2014

Monday, November 24, 2014

Portrait Photoshop Actions

7 Portrait Photoshop Actions You Will Love

7 Fab Photoshop Actions
Photoshop actions. Love them. No, seriously…I LOVE them!
If you’re unfamiliar with Photoshop actions, this is your lucky day. These time saving short cuts will fast become your best friend; just follow the links below to some of my favorites. You’ll be walked through the process and be well on your way to boosting your photography to the next level.
Even if you’re a seasoned pro you might just find a gem in this set. Did I mention I love them?
So with that in mind, here are 7 of my favorite portrait Photoshop actions:
Boom - Increase saturation and contrast
Contrast and saturation.  You have to be careful when boosting the color saturation and contrast of a photo; it can get overdone FAST. This tutorial by Jodi Friedman at MCP Actions does an amazing job of walking that line. Too much for you? There’s a more subdued version of the original photo on her post as well. Truly something for everyone.
Vintage photography look with photoshop actions
Vintage is hot. It’s everywhere, and for good reason. Layering on a vintage look to your photos helps tell a story…and isn’t that what photography is all about, really? I love this action from Envye; it adds some yellow and cyan hues that scream early days of color film photography.
Baby photo transformed with photoshop actions
Oh, baby. Seriously…how amazing is this transformation? It’s not just one action, it’s a series…and they add up to serious WOW. Great tutorial by Jodi Friedman at MCP Actions.
Desaturation photoshop action for amazing portrait
Not sure where to start? This post by Photo Tuts+ has one hundred amazing tutorials; it’s bursting with advice and tutorials and everything you’ll need to dip into the world of Photoshop actions, or bump up your action arsenal if you’re already an old hat. I particilarly love this portrait action by Provity. Just. Wow.
Softness photoshop action for photography editing
Lighten up. Sometimes what a photo needs is a bit of softening…less color popping, less harsh edges, more quietnessThis Photoshop action by Making Nice in the Midwest does the job- and then some. Awesomeness.
Painterly photoshop action for an artistic look
Artistic touch.  If you’re looking to take your photo to a more fine art level, this action from Digital Photo Buzz can add an artistic, painterly effect to your photo.
Gorgeous retouching and makeover photoshop actions for amazing picture editing
Perfecting perfection. When you want every last bit of a portrait to look like the person is having their best day ever (and you don’t always want this, but you probably will at some point) then this Florabella Retouch & Makeover Retouch Actions will do the trick for you without being crazy overwrought.

Tuesday, November 18, 2014

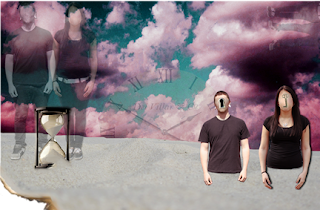
Assignment: Surrealistic Photomontage

Due: December 1st 2014


Cassy Siena

image

HOW to COMPLETE PROJECT:


1. You will need to decide on a theme for your photomontage project. I would like you to write a paragraph based on a theme idea that you have. Some examples of themes could be a memory, dream, social issue, self portrait, and or traveling.
Shagufta Zareen

2.Describe the types of images that you are thinking of using and how you are going to manipulate them to support your theme. Bring in 3 original images, one scanned image and one image from a website. 


This final project will require TWO posts. The first will be an explanation of your plan for the image.


(Example of POST #1)
Title: Surrealistic Theme For my surreal photomontage I would like to do a self portrait. I really liked the art and portraits of Oleg, the artist i did for my surreal artist. In order to meet the number of images i need in this project Im going to do the self portrait in a mirror, using one image of the back of my head and another of my face in a mirror. That's what i know of that part....as for the next part with the other pictures were I have two idea and Im not sure which I prefer yet.

1) The mirror will be partially cracked, each little section of the cracked mirror will have another image of something nice and warm and outside partially see through so that my image is still visible through it. The other side of the mirror will be fine, no cracks or anything. This will represent me in that the half that is intact will be reality, this is me now and what i look like. The cracked half is broken and shows where I want to be and I what I want but cant necessarily get or have so a 'broken' thought I guess.

2) The same idea but this one the image of me and the mirror will have a hand up, one finger out touching. The part were the fingers are touching in the mirror will be rippled like water, distorting the reflection. I will use pictures of water and stuff to make the mirror look watery and reflective.


(Example of POST #2)
Title: "Mirror to the other Side"

And of course, as always, an artist statement. Use this area to explain describe, analyze and interpret your image in comparison with what you had planned, problems you ran into, etc. .


SAVE YOUR FINAL IMAGE IN MAJOR FOLDER AS
LAST_FIRST_SURREAL

What is SURREALISM in photography?


Surrealistic Artists Research: Due Wednesday November 19 2014
Part #1-For your surrealistic photomontage project you are going to need to choose 2 surrealistic artists to review. Write a brief biography (one paragraph minimum) on each of your artists. ONE must be a painter, sculptor, etc. and ONE must be a photographer, however, both need to be SURREALISTS.
Part #2 Describe their work by including the art critique method we used in class. Include the pictures of each of the art work that you choose.
Artist Review                                  
Artist’s Name  ___________________________________
Title of Artwork ______  Date of Work ______________
Description: The Facts Identify everything in the art work: (Objects, Lines, Shapes, Textures, Values)
Analysis:The Design Determine how the artwork is organized or composed. (Balance, Lights/Darks, Focal Point, Rhythm, use of Layers, Color enhancements, special effects)
Interpretation:The Meaning Explain what you think the artwork means or what the artist is trying to communicate:
Judgment:Make a personal decision about the artworks degree of success and an example of why you feel the way you do.
Part #3 -Compare and contrast each of the artists in terms of subject matter, techniques, style, or life background.

Please see Surrealistic Photo Montage Project in your MAJOR assignments folder, for an example of what this POST should look like when complete.

(Image Source: WALEE)
 

Friday, November 14, 2014

Become Someone Else!

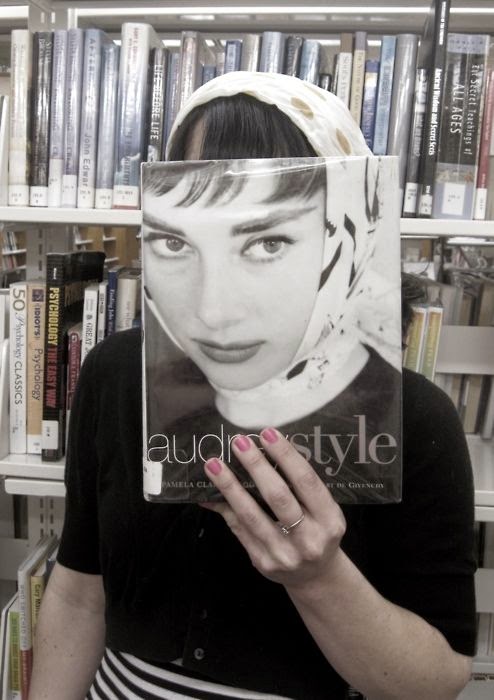
It’s a new marking period… so put on a new (book) face for our latest and greatest library contest!  Here’s what you do on our photo walk to the library today:
  1. Find a book with a face or part of a face on the cover.
  2. Put your face in the book.
  3. Have a friend take a picture of your bookface.
  4. REPLACE book EXACTLY where you found it so you don't mess up stacks!
  5. Submit it to the class contest by POSTING before Monday morning.


***Yes, this assignment is a required one, so if you are not posted by Monday, you will not be included in contest, however you may hand in for a late grade regardless.***

Wednesday, November 12, 2014

PDNedu Student Photo Contest

TO ENTER CLICK HERE!


The PDNedu student photo contest is open through December 8. Enter to win a Nikon D5300 camera, a B&H gift card, a portfolio consultation and recognition in the print and online gallery!
The PDNedu Student Photo Contest 2015
: Photo by Alvaro Keding

Alvaro Keding was the grand-prize winner in the 2013 Fine Art/Personal Work category for his series "Tailored Habitats" (above), which explores the artificiality of zoo settings. The School of Visual Arts graduate will be exhibiting his work for the Miami Project in December 2014.
Get inspired by last year's talented winners at contest.pdnedu.com/gallery/2014.
To enter this year's contest, visit contest.pdnedu.com.

Monday, November 10, 2014

Assignment: Photo Journal... the book making part


Fall Break Assignment: Photo Book via Blurb.com

  • You will be uploading your photos from Spring Break week, please create a folder titled "Journal" so that you get credit for shooting the 50 images over break. (20 points of final grade: Due Today, 11-10-14)
  • Have your journal out so I can see what you've been writing and keeping track of all week. (20 pts of final grade: Due Today, 11-11-14)


  • When finished uploading, please click on the following link to BLURB and create your user name and password if you did not do so yesterday. Click on JOIN BLURB in top right hand corner. Use the email address you created for THIS CLASS.
  • EMAIL ME IMMEDIATELY WITH YOUR USERNAME & PASSWORD. Email message should look like this:
Subject: LastName, Block #
Message: Nicole Vignola  
                          <nicolekvignola@gmail.com>
                           Username: nicolevig
                           Password: cartel1005

  • Explore the book making options. Keep in mind- creativity is key! You can photograph your writing from the week off, you can photograph your text even if you prefer that over typing, just be sure it's readable, and do not do that for the entire book.(60 pts of final grade)
    • you do not have to use every single image
    • your book SHOULD have a theme, and not just “spring break”.
    • creativity is key!
    • spelling errors will NOT be tolerated! spell check!
    • Yes, you need a title page.
    • yes, you SHOULD use Photoshop to edit your images, before simply inserting any image into your book. Try layering, color correcting, etc.
    • Your book needs to be at least 20 pages long, not including the title page and does not have to use every photo you took. Select only the best for the book.
FINISHED BOOKS DUE Thursday November 14, 2014


POST screen shots of 5 of your favorite pages, just like Paula did here:
http://medinapaula31.blogspot.com/2013/04/photo-journal.html

Monday, November 3, 2014

Assignment: Photo Journal.. the picture part

PHOTOS uploaded and Written portions DUE: Thursday November 10th (The Monday we return from Spring Break
FINAL DIGITAL JOURNAL DUE: THURSDAY November 13th ) 
Over break, You will be responsible for creating the images and written descriptions to create a digital photo journal. As always, the project has been outlined below.


 “How do I do that?” you ask..
1. Over the course of the weekend and days off, document your thoughts and feelings about particular people, places, and events you visit or encounter. Not only must you photograph these people, places or things, but you must keep a written journal about what you experience during this time.  
2. Choose a theme, for example "all the food I ate" or "all the people I encountered" etc. Your theme may not become apparent until after you've shot for a few days, so shoot EVERYTHING, from your sports practice, your vacation, family time, etc.
3. When you return from Break, we will view your journals and upload your pictures and you will make a digital version of the hand written example above.. (Details about what will be done IN CLASS will follow) The final project will be a digital photography book.
“So how do I start?” You ask..
Start SHOOTING and WRITING.. as soon as you leave school TODAY.. the more you document, the more material you will have for your digital journal. Do not save this assignment for the weekend before you return to school, your lack of effort will be obvious and your grade will reflect it.
“What are the specifics?” you ask..
You must have AT LEAST 50 photographs (that’s less then 10 a day for those of you breaking it down). And for each photo, a detailed description of your thoughts, feelings, or surroundings at the time the picture was taken. You might not use all the photos in your final compilation, but you will need to have them on Thursday, when we return to school, for full credit. 

THIS IS A MAJOR ASSIGNMENT

Click link below for an excerpt of this project
http://medinapaula31.blogspot.com/2013/04/photo-journal.html